Introduction
Hello! If you’re here, it means that you want to know more about how to get a service called If-This-Then-That, or IFTTT, integrated with Snowy, the personal assistant app for Pebble Time. Awesome! Snowy can already do a lot, but with IFTTT, the possibilities are nearly endless!
Below, you’ll find step-by-step instructions on setting up an IFTTT account, creating recipes, and configuring them so that you can use them via Snowy. If you’re already familiar with IFTTT, and just want to see some of the more popular recipes from the Snowy community, feel free to check out Snowy’s Cookbook!
Step 1 – Creating an IFTTT Account
First, open a browser (you’ll find this easier to do on a desktop or laptop, but you can do it on your phone if you like) and go to ifttt.com/join. Follow the instructions to create your account.

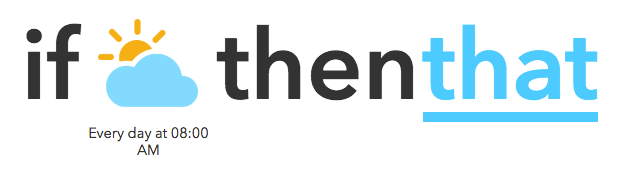
After creating an account, the first screen that IFTTT presents you with is this:

This is where IFTTT gets its name from. You create “recipes” that basically say, if this happens, do that. Click “this” to start the onboarding flow and select some interesting “channels”. When you’re done, feel free to scroll through the Recommended Channels to see if there’s any pre-made Recipes you like, but don’t fret if there isn’t. We’ll create our very own simple Recipe right now.
Step 2 – Your First Recipe, Part 1 (This)
For our first Recipe, we’re going to create our own personal, daily, Weather Report! Click the My Recipes link in the top right corner of the page, then click Create a Recipe on the big blue button. This time, when you click “this”, you’ll see the option to “Choose Trigger Channel”. This means choose how your Recipe will be kicked off. Each Channel has their own unique triggers. For example, “Android Battery” has a trigger that is fired if your Android device battery falls below 15%. Another popular one is the “Stocks” channel, which can trigger a recipe if a certain stock rises above a specified price.
There are tons of Channels that can be triggered by and do all sorts of things, with more being added all the time. Don’t be overwhelmed! You can ignore the Channels you don’t know or can’t use and search for a specific one via the search bar. For our first Recipe, search for “Weather”, and click on the generic “Weather” Channel (not the Netatmo Weather Station!).

Next, IFTTT will ask you to connect the “Weather” Channel. You’ll have to do this for every Channel your Recipes use, though some are easier than others. Since “Weather” is a generic IFTTT Channel, all you need to do is search for your current location and click Connect. Once complete, you’ll see a confirmation message. Click Done, and then Continue to next step, to get back to building your Recipe.

There are many Trigger options available for this Channel! Let’s keep it simple, and choose the first option, “Today’s weather report”. Set the “Time of day” to be right before you head out for the day each morning, like this:

Click Create Trigger, and we’re all set with the “this” portion! Time to move on to “that”.
Step 3 – Your First Recipe, Part 2 (That)
If you’ve gotten everything set up in “this” as outlined above, you should see the following screen:
Clicking on “that” brings us to a familiar looking screen. Now, IFTTT wants you to choose an “Action Channel”. Just like with Trigger Channels, Action Channels have multiple options if you select them. This is the part where you tell IFTTT, “under the condition I just created, do the following thing.” For this recipe, search for and select the “SMS” Channel.
When connecting this Channel, you’ll see a slightly different prompt:
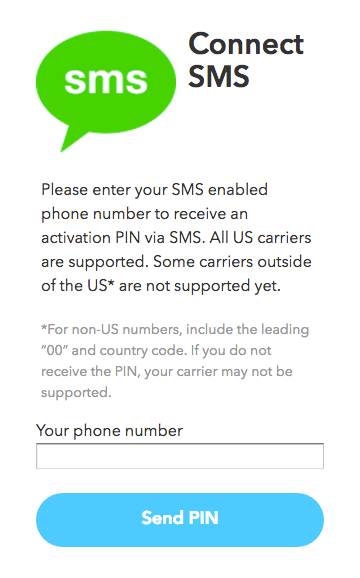
Each Channel will be different. If you want to connect to a Channel like Facebook or Twitter, for example, you’ll have to sign in to your accounts for those services, and give IFTTT permission to access them as needed. In this case, all the “SMS” Channel needs is your phone number. To make sure you aren’t inputting someone else’s phone number, IFTTT will first send you a text with a 4-digit PIN. Once you receive that PIN, enter it into the “PIN” field and click Connect. If you don’t receive a message, you can also click Retry. Once the Channel is set up, click Continue to the next step.
The “SMS” Channel only has one Action, which is, unsurprisingly, to send you an SMS! Once you select “Send me an SMS”, IFTTT will ask you complete the “Action Fields”. You’ll see a pre-formatted message for the SMS, based on the fact that you chose the “Weather” Channel as your Trigger.
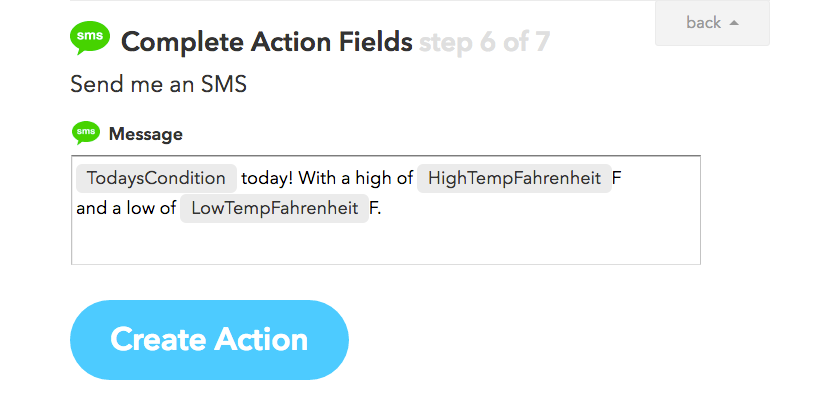
You’ll notice that some of the words in the message have a gray background and no spaces. These words actually indicate variables that IFTTT will pull from the “Weather” Channel and insert into the “SMS” Channel to send you the message. Clicking into the text field removes the gray background and displays {{ and }} around each variable. We’ll get into these more later, when we talk about using a very important Channel in conjunction with Snowy. For now, just click Create Action.

Finally, give your Recipe an appropriate title (you may want to remove your phone number if you intend to make the Recipe public!) and click Create Recipe. Congrats! You’ve made your first IFTTT Recipe!
Note that on the Recipe page, you can turn the Recipe off, publish it to the broader IFTTT community, make sure the Recipe is working by checking it, look at your logs to see when the Recipe has been run, or delete the Recipe altogether. You can always find this page again via that same My Recipes link in the top navigation area we went to when we started this tutorial!
Step 4 – Creating a Recipe with the Maker Channel
Now we get to the reeeaaally fun stuff! Let’s say that, hypothetically, you didn’t want to have to wait for a specific time, or for a specific stock price, or a specific battery level, to trigger an Action. You want to be able to, say, visit a URL whenever you want, and have that trigger an Action. The good news is, with the Maker Channel, you can. The even better news is, Snowy can visit the URL for you.
But let’s not jump ahead! First, we’re going to create a new Recipe with the Maker Channel as a Trigger. There are no permissions or logins necessary to connect this Channel, so go ahead through the connection flow, and then choose “Receive a web request” as the Trigger. Now, the options for the Trigger are to set the “Event Name”. For reasons that will become clear later, make the Event Name “snowy_say_hello”, like this:

Click Create Trigger, then select the “SMS” Channel as the Action. Choose “Send me an SMS” again. Replace the text in the Action Field with a simple, “Hello, world!”, like this:

Go through the rest of the flow to finish creating the Recipe.
Step 5 – Using the Maker Channel
Now that you have a Recipe set up and ready to go, we need to figure out how to properly trigger the Maker Channel event, “snowy_say_hello”. Go to the top right corner again, but this time, click Channels. Search for the Maker Channel (it’ll be under DIY Electronics), and select it. This will take you to the Maker Channel detail page. You can also get there directly by visiting ifttt.com/maker.

If you click on your Maker Channel Key, you’ll see some more technical details about how to Trigger a Maker Channel Event. You don’t really need to worry about that part, but you can check it out if you think you might want to use this Channel beyond Snowy.

To test your Recipe, all you need to is visit maker.ifttt.com/trigger/snowy_say_hello/with/key/YOUR-PERSONAL-MAKER-CHANNEL-KEY in a browser. Once you do that, you should see a confirmation message: “Congratulations! You’ve fired the snowy_say_hello event”, and receive an SMS with “Hello, world!” shortly thereafter.
Step 6 – Bringing Snowy into the Mix
Finally, go Snowy’s Settings page by tapping the gear icon in the Apps section of the Pebble Time mobile app. Enter your Maker Channel Key into the right field, and tap SAVE SETTINGS. Scroll through the confirmation message you should get on your Pebble and make sure that it says “Maker Key: Valid”. When you save your key, Snowy does a quick validity check to make sure your real recipes will run correctly. If this says Invalid, or you are unable to get Recipes to trigger correctly, you may want to Disconnect and Reconnect the Maker Channel in IFTTT.
Once everything is properly set up, activate Snowy’s Listening Mode and say loud and proud “Please say hello”. Snowy will display a confirmation message that you’ve just fired the “snowy_say_hello” event in IFTTT, and you’ll get the SMS soon after.
It’s important to note how Snowy interprets commands for IFTTT. The most crucial thing to remember is that “Snowy will trigger events on IFTTT if you ask nicely”. This will remind you that “please” is the key word that indicates to Snowy you would like to make an IFTTT request via the Maker Channel.
Also important is how Snowy converts the rest of your command into an event name. Outside of a few exceptions, which I’ll get to in a minute, Snowy will combine every word in your command besides “please” by replacing all spaces with underscores, and prepend “snowy_”. This last part is to help indicate to other IFTTT users that this is a Recipe for Snowy. So, once again, “Please say hello” becomes “snowy_say_hello”.
Step 7 – Variables
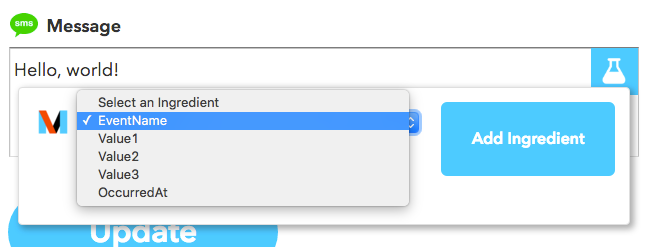
Let’s revisit those gray blocks of text you saw in the first Weather Report Recipe and the Say Hello Recipe. If you go to My Recipes, and select the “if M then SMS” Recipe (this is our Say Hello recipe), you’ll see the details for that Recipe. Scroll to the bottom of the page, until you see the “Action” section. Click into the text field.
Click the blue lab beaker icon in the top right corner of the field. You’ll see the Maker Channel logo, and a dropdown that says “Select an Ingredient”. These Ingredients are different for every Trigger, and for Maker Channel the options are: EventName, Value1, Value2, Value3, and OccurredAt. EventName is the Event Name, and OccurredAt is the date and time of when the Recipe is fired. Value1, Value2, and Value3 are optional pieces of extra data that can be passed in via URL parameters. We’ll cover those more in Step 9 – Custom Commands + Values.
Step 8 – Built-In Recipes
Snowy has a few built-in Recipes, to make getting started with IFTTT and Snowy a breeze. With these Recipes, a more flexible mix of keywords will trigger them, so you don’t have to worry so much about specific phrasing. The four stock Recipes are:
- Call your phone
- Example Command: “Please call my phone”
- Event Name: snowy_find_my_phone
- Keywords: phone, find, call
- Turn lights on*
- Example Command: “Please turn on my lights”
- Event Name: snowy_lights_on
- Keywords: lights, on
- Turn lights off*
- Example Command: “Please turn my lights off”
- Event Name: snowy_lights_off
- Keywords: lights, off
- Set temperature on thermostat
- Example Command: “Please set my thermostat to 72”
- Event Name: snowy_thermostat
- Value1: 72
- Keywords: thermostat
*Note that the built-in “Lights” command has negative keywords as well, which will instead make Snowy treat your command like a Custom Command (see below). For example, if you wanted to “dim” or “set” your lights to a specific level (with smart bulbs like Phillips Hue), that would be a custom command. Same if you wanted to turn the lights on or off for a specific room in the house. For example, the bedroom, living room, bathroom, kitchen, etc.
Step 9 – Custom Commands + Values
If you say “please”, but don’t say one of the keywords from the built-in Recipes, Snowy will interpret your command as a Custom Command. I’ll mention this again, since it bears repeating: Snowy will combine every word in your command besides “please” by replacing all spaces with underscores, and prepend “snowy_”.
So, it’s best to keep these commands short and to the point, to reduce the risk that Nuance misinterprets one of the words and you fire “snowy_close_the_second_garbage_door” rather than “snowy_close_the_second_garage_door”! In that case, you might want to go with a shorter Event Name like “snowy_close_second_door”.
As you can see in the last built-in Recipe, Set temperature on thermostat, Snowy can pass specific values in with its requests. There are several ways to indicate that your words represent one of these values, rather than just another part of the command that will be turned into the Event Name.
- to: If you include this keyword, followed by a number, at the end of your command, Snowy will extract the number as pass it along as Value1.
- Example Command: “Please dim my lights to 50”
- Event Name: “snowy_dim_my_lights_to”
- Value1: 50
- saying: If you include this keyword, Snowy will pass all words after this value as a string to Value1.
- Example Command: “Please send my wife a text saying I’m on my way home”
- Event Name: “snowy_send_my_wife_a_text_saying”
- Value1: “I’m on my way home”
- values…and…and: This is the most flexible keyword. Snowy will take the numbers or text between values and each instance of the word “and” and pass them along as Value1, Value2, and Value3.
- Example Command: “Please send Mike an email with values Let’s grab dinner and How does 4 pm sound?”
- Event Name: “snowy_send_mike_an_email_with_values”
- Value1: “Let’s grab dinner” (Email Subject Line)
- Value2: “How does 4 pm sound?” (Email Body)
Conclusion
And that’s it! You’re now ready to get going with IFTTT and Maker Channel integration with Snowy. Share your favorite Recipes on Reddit and the Forums, and if you want to see what other Snowy users have come up with, check out Snowy’s Cookbook.
